Measuring play of wheel control joints
To prevent unnecessary or faulty repairs in the area of the front axle, the following information on checking the wheel control joints must be observed without fail!
Measuring equipment
Before replacing wheel control joints, the play of the joints must always be checked using the electronic axial play measuring device. The wheel control joints may only be replaced if the measurement results indicate that this is required.
- Sliding piece (31 1 061)
- Measurement electronics (31 1 062)
- Magnet holder for vehicles of the model series E46 and E85 (31 1 063)
- Electronic evaluation unit (31 1 064)
- Magnet holder for vehicles of the model series E53 and E83 (31 1 065)
- Comb wrench (31 1 066)
- Measuring clip (31 1 067)
Connection and instructions
Fit and set the testing device in the vehicle according to the specifications in the repair instructions. Run the measurement according to the specifications in the repair instructions.
Repair instructions: TIS 31 12 023 Measure play of wheel control joints
Brief description
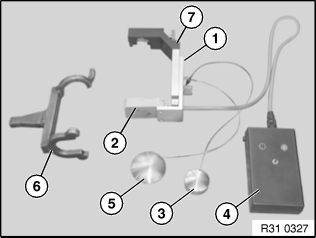
- Place the magnet holder (5) on the housing cover (E53/E83) or magnet holder (3) on the housing base (E46/E85) of the control arm.
Important: Ensure the magnet holder is correctly seated in the control arm!
- Place the measuring clip (7) (with sliding piece (1) and measurement electronics (2)) on the threaded stem of the joint and tighten
Important: the measuring clip must not touch the control arm!
- Press the button of the electronic evaluation unit (4). The device runs a self-test. First of all, both LEDs flash, then the red LED lights up continuously.
- Push the measurement electronics (2) with sliding piece (1) upwards until the green LED lights up and then fix in place with the clamping bolt.
The gap between the measurement electronics (2) and magnet holder must now be approx. 5 - 7 mm.
- Press the button of the electronic evaluation unit (4) for 2 seconds until the green LED flashes. The device is now calibrated and ready to measure.
- Fit the comb wrench (6) on a torque wrench. Set 60 Nm at the torque wrench.
Check wheel control joint. See repair instructions TIS 31 12 023.
- Reposition the comb wrench and run the 2nd test. See repair instructions TIS 31 12 023.
- If the red LED flashes on the electronic evaluation unit during either of the two tests (4), the joint must be replaced.
If the green LED flashes during both tests, the joint is OK and must not be replaced!

